Разное

Калина 2 замена передних тормозных колодок: Замена передних и задних тормозных колодок Лады Калины-2 своими руками + видео

Замена передних колодок | Лада калина 2

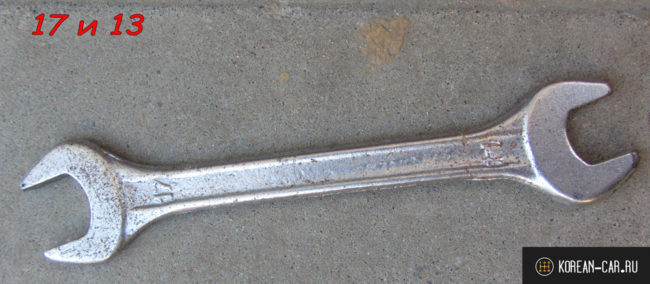
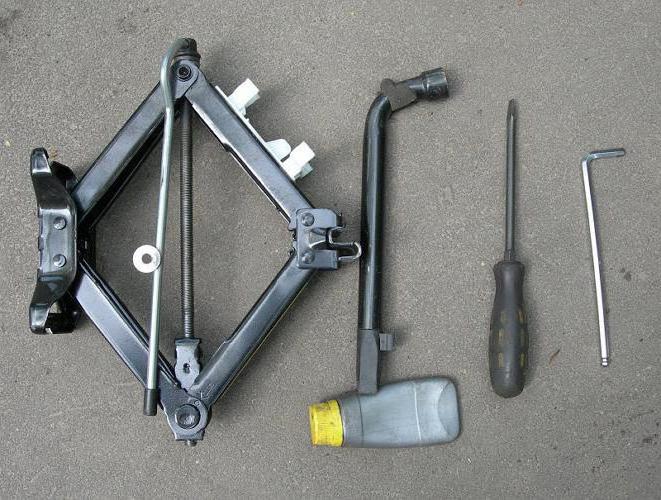
Вам будут нужны: отвертка с плоским лезвием, молоток, зубило, колючи «на 13» и «на 17»

Состояние колодок тормозных следует проверять при каждом техобслуживании.

Колодки тормозные нуждаются в замене в случае износа накладок (минимально допустимой толщиной накладок фрикционных являются 1,5 миллиметра), если накладки непрочно соединяются с основанием, при замасливании рабочих поверхностей, обнаружении сколов либо глубоких борозд.

Предупреждение

Колодки тормозные механизмов передних тормозных следует заменять исключительно в комплекте из 4 штук (по паре на каждую сторону).

1. Машину затормозить стояночным тормозом и под задние колеса установить противооткатные башмаки-упоры.

2. Проверить уровень жидкости тормозной в бачке основного цилиндра тормозного. В случае, если уровень жидкость тормозной в бачке основного цилиндра тормозного близок к отметке «MAX» или равен ей, нужно откачать часть жидкости из бачка при помощи резиновой груши либо медицинского шприца, так как по замене изношенных колодок на новые уровень обязательно поднимется.

3. Вставить большую отвертку между колодкой тормозной внутренней и поршнем цилиндра рабочего и утопить поршень цилиндра рабочего в цилиндр.


4. Отогнуть угол шайбы стопорной от нижнего болта крепления пальца направляющего от суппорта.

5. Вывернуть болт для крепления пальца направляющего, придерживая палец ключами за шестигранник.


6. Развернуть суппорт вверх вокруг оси пальца верхнего направляющего…

7.…и снять колодки тормозные.


Примечание

Обратить внимание на маркировку на колодках. Для замены приобрести колодки с такой же маркировкой.

8. Очистить от ржавчины и грязи детали тормозного колесного механизма, в особенности, посадочные места колодок тормозных. Делать это с осторожностью, чтобы не был поврежден чехол защитный от цилиндра.

Полезные советы

При каждой замене колодок тормозных обязательно проверять, в каком состоянии находятся резиновые чехлы защитные пальцев направляющих, а также перемещение суппорта относительно направляющей от колодок тормозных. В случае, если перемещение затруднилось, нужно смазать пальцы от суппорта направляющие консистентной смазкой.


9. Установить новые колодки тормозные. Пружины нажимные обязаны устанавливаться параллельно верхним краям колодок.

10. Опустить вниз суппорт и отвернуть болт для крепления нижнего направляющего пальца, удерживая палец ключом за шестигранник.

11. Загнуть угол шайбы стопорной, таким образом зафиксировав болт для крепления пальца, предупреждая отворачивание.

12. Установить колесо.

13. Аналогично заменить колодки тормозные второго колеса переднего.

14. Несколько раз нажать на тормозную педаль, чтобы поршень установился в рабочее положение.

15. Проверить уровень жидкости тормозной в бачке и довести его при необходимости до нормы.

Полезные советы

После замены изношенных колодок тормозных на новые не следует сразу же спешить выезжать на оживленные магистрали. Волне возможно, что при первом интенсивном торможении вы может быть неприятно поражены малой эффективностью тормозов, несмотря на установку фирменных колодок. Диски тормозные также изнашиваются, а новые колодки их касаются только краями, почти не тормозя. Вот почему следует выбрать тихую улочку или проезд без машин, чтобы несколько раз плавно затормозить и позволить колодкам притереться и начать прилегать всей своей поверхностью. Таким образом можно одновременно оценить эффективность тормозов.

Лучше не тормозить резко как минимум первую сотню километров. Из-за сильного нагрева не приработавшихся колодок может подгореть верхний слой их накладок, из-за чего тормоза еще долго не будут становиться максимально эффективными.


Как заменить передние тормозные колодки на Лада Калина: фото и видео

Все работы по замене можно проводить самостоятельно, если понимать особенности и последовательность процесса. Кроме того, до начала выполнения задач нужно купить новые тормозные колодки, используя артикулы из статьи.

Необходимый инструмент

Ключ гаечный на 17 и 14 вблизиКлюч гаечный на 17 и 14 вблизи

Ключ на 17/14. Понадобится ещё на 13.

Для проведения демонтажа потребуется

2 ключа (на 13 и 17). При наличии ABS — TORX (1/4″; E8).

Алгоритм замены

  1. Машину вывесить на домкрате, предварительно сорвав болты с колеса. Снятие переднего колеса на автомобиле Лада Калина для замены тормозных колодокСнятие переднего колеса на автомобиле Лада Калина для замены тормозных колодок

    Ослабляем болты, пока колесо стоит на земле.

  2. Снять само колеса и монтировкой и отверткой отжать цилиндр тормоза. Для удобства выполнения процесса рекомендуется сразу вывернуть руль влево или вправо, в зависимости от стороны.

    Домкратим колесо.

    Для страховки подкладываем колесо под днище.

    Утапливаем поршень отверткой.

  3. С другой стороны суппорта снять или отжать стопорную пластину. Скоба-фиксатор на болту крепления суппорта в передних тормозах Лада КалиныСкоба-фиксатор на болту крепления суппорта в передних тормозах Лада Калины

    Отгибаем скобу толстой отверткой.

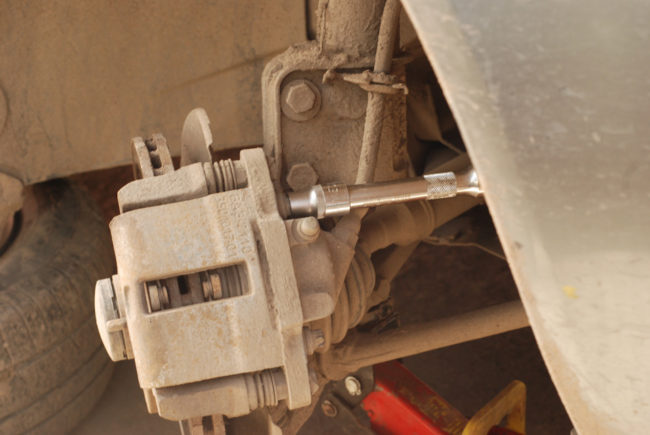
  4. Ключом на 17 нужно придерживать гайку и открутить рожком на 13 направляющий болт. Выворачивание болта суппорта в передних тормозах Лада КалиныВыворачивание болта суппорта в передних тормозах Лада Калины

    Верхний болт удобнее отворачивать торцевой головкой с удлинителем.

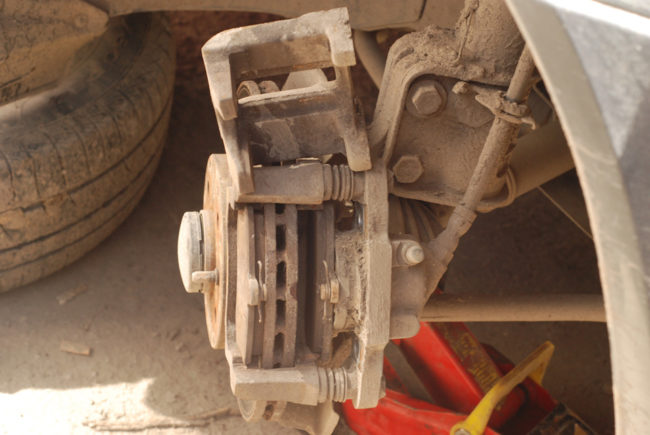
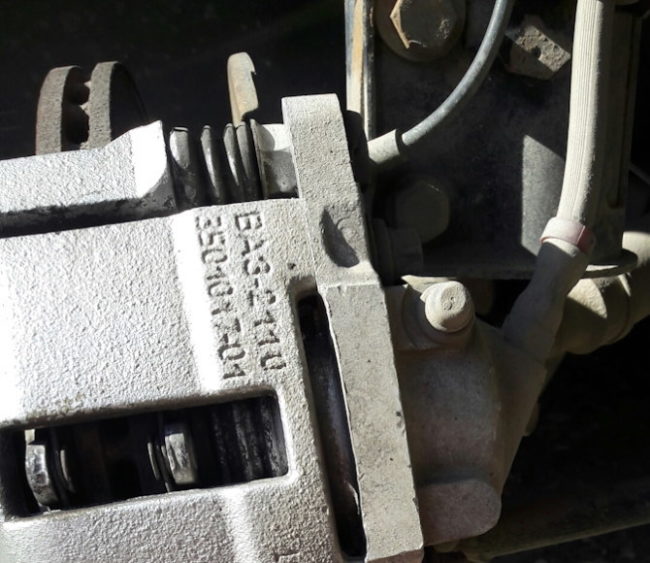
  5. Открыть тормозной суппорт, чтобы достать старые колодки. Тормозной диск переднего колеса в Лада Калине со снятым суппортомТормозной диск переднего колеса в Лада Калине со снятым суппортом

    Снимаем суппорт и вытаскиваем старые колодки.

  6. Свести цилиндр до самого конца и вставить новые детали, после чего закрыть его и собрать все в обратной последовательности, перейти на другую сторону авто.

    Вставляем новые колодки.

    Одеваем скобу и проверяем положение усиков, которые должны упираться в скобу.

При наличии системы ABS нужно учесть особенность. До начала работ следует открутить датчик, чтобы он остался целым при демонтаже. Крепится он 1 винтом

, который откручивается звездой-головкой Е8. Если болты не откручиваются, их нужно предварительно сбрызнуть смазкой WD-40, а через 15 минут пробовать откручивать детали. Она же может использоваться для новой колодки, чтобы было проще вставлять их.
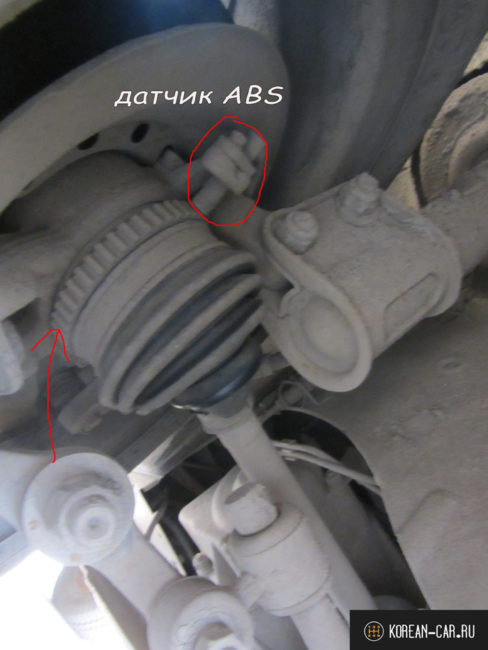
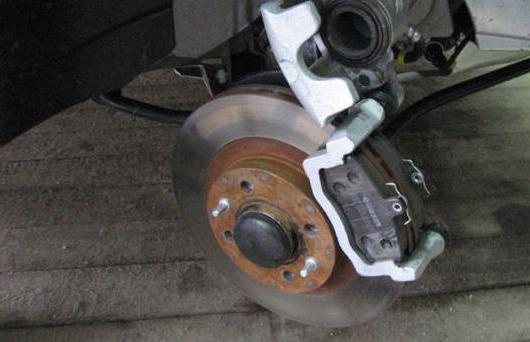
Механизм и датчик ABS вблизи на Лада КалинаМеханизм и датчик ABS вблизи на Лада Калина

Автомобиль с ABS.

Процедура снятия и установки колодок занимает не более получаса для 1 стороны.

Сразу после установки необходимо прокачать тормоза, нажимая на педаль несколько раз. На протяжении 500-700 км пути пластины будут притираться, поэтому торможение будет хуже.

Рекомендуется перед началом работ убрать тормозную жидкость до минимума. Это необходимо чтобы она не вытекла во время замены, поскольку новые детали всегда толще старых элементов. В таком случае при замене потребуется «

свести суппорт«.

Уровень тормозной жидкости в расширительном бачке под капотом Лада КалиныУровень тормозной жидкости в расширительном бачке под капотом Лада Калины

Если тормозуха под крышку – откачиваем шприцом небольшое количество, чтобы жидкость не потекла при сжатии тормозного цилиндра.

Артикулы тормозных колодок

Колодки на первое и второе поколение разные. Варианты без АБС.

Для Калины 121100-3501080-00 или 21100-3501080-01.

Комплект колодок переднего тормоза ТИИР-295 для Лада Калины

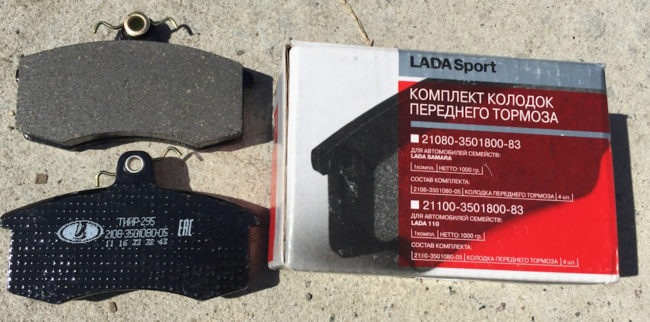
Колодки LADA Sport (ТИИР-295) для Калины первого поколения.

  • ATF 142E3946
  • AVTOSTANDART 21100350108088
  • PILENGA ITALY FD-P 2005
  • FORTECH FB-1102F
  • TRIALLI PF 965
  • KRAFT KT091355
  • FINWHALE V210
  • BOSCH 0 986 495 214
  • LUCAS/TRW GDB1446
  • BOSCH 0 986 494 533

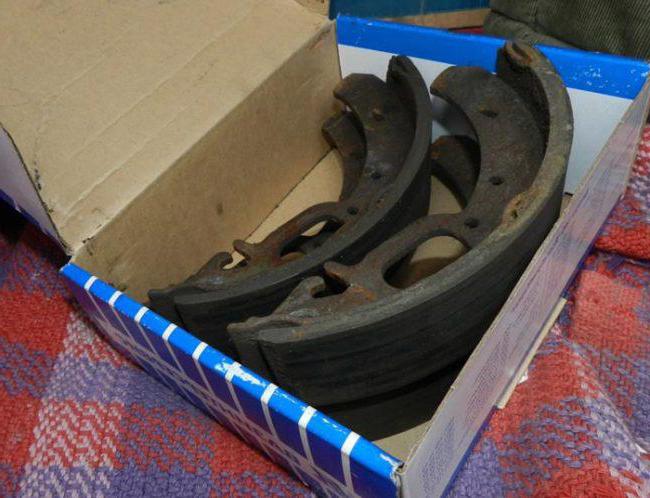
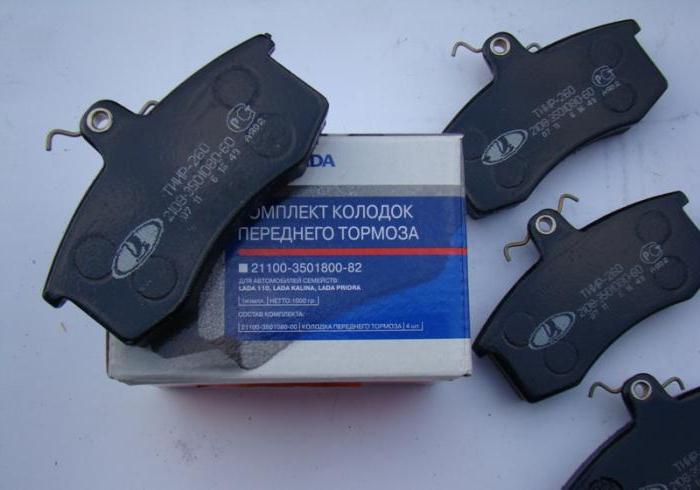
Для второго поколения применяют артикул 11180-3501800-83.

Новын колодки ATE для передних тормозов отечественного автомобиля Лада Калина

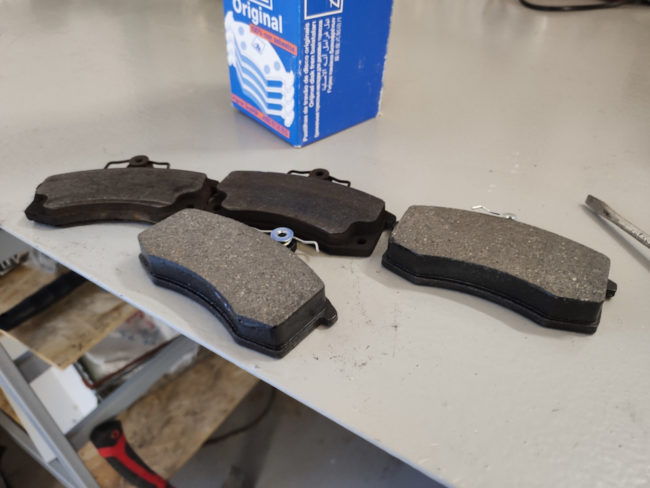
Колодки АТЕ артикул 142E3946 в оригинальной упаковке.

Аналогичные номера используются для Лады Приоры. Владельцами замечено, что с завода используют колодки ТИИР, но они отличаются средним качеством, быстрым износом, а также появлением скрипа во время торможения после нескольких тысяч километров пути.

Когда менять (регламент)

Смотровое окошко на скобе суппорта передних тормозов в Лада КалинеСмотровое окошко на скобе суппорта передних тормозов в Лада Калине

Для контроля износа колодок достаточно заглядывать в смотровое окошко пару раз за год, например, при смене резины.

  • Замену передних колодок необходимо проводить в 1.5-2 раза чаще, чем обслуживание задней тормозной системы.
  • Точно определить пробег для замены сложно, но в среднем износ наступает через 30-50 тыс. км.
  • Для точной диагностики рекомендуется каждые 10-15 тыс. км проверять толщину накладки на колодках.
  • Критическое значение – 2 мм и менее.

Подробно о выборе передних колодок мы уже писали.

Тюнинг

Тормозную систему можно доработать, установив колодки спортивного типа марок: Брембо, Ванкс или ПроСпорт.

Однако для проведения такой работы потребуется не только установить новые колодки, но и заменить суппорта, ведь они будут отличаться по размерам от стандарта.

При тюнинге мы рекомендуем использовать мягкие колодки, у которых на 1 мм толще пластины. Они позволяют обеспечить улучшенное торможение, а скорость износа диска будет в несколько раз меньше, однако срок эксплуатации и замену выполнять приходится каждые 15-20 тыс. км.

Особенности замены и причины

Глубокие борозды на тормозном диске переднего колеса в Лада КалинеГлубокие борозды на тормозном диске переднего колеса в Лада Калине

Мы рекомендуем приобретать только качественные расходники. Колодки плохого качества могут приводить к преждевременному износу тормозного диска.

Существует много причин, в результате которых нужно проводить замену.

  1. Появление скрипа в колесах во время торможения.
  2. В ходе «рассыхания» основных элементов внутри суппорта, появляется посторонний звук.
  3. Обязательна смена элементов после покупки подержанного транспорта или проверки их толщины.
  4. Износ настолько сильный, что остаток пластины менее 2 мм.
  5. Обязателен осмотр и замена после зимы или 1 раз в год.
  6. При торможении появляется неравномерный результат остановки автомобиля.

Описанные факторы должны насторожить водителя и привести к потребности диагностики тормозной системы, замены передних колодок.

замена. Замена тормозных колодок «Калина-2». Замена передних и задних тормозных колодок на «Калине» (универсал)

Покупая автомобиль, будущий владелец обязательно столкнется с необходимостью обслуживания машины, замены расходных материалов, ремонтов. Многие современные водители предпочитают отдать автомобиль в сервис, чтобы там для него провели техническое обслуживание и заменили все что необходимо. Но за такой сервис приходится платить. А если у человека есть необходимый инструмент, тогда любые работы по обслуживанию машины можно выполнить своими руками, даже если необходимо поменять тормозные колодки («Калина»). Замена эта представляет собой простой процесс и не потребует много времени. Давайте рассмотрим, как это сделать.

Когда требуется заменить колодки?

Процесс установки данных элементов на автомобилях серии «Лада Калина» чрезвычайно прост.

лада калина замена задних тормозных колодок Это актуально для большинства отечественных автомобилей. Но другой вопрос: когда же нужно менять эти расходные материалы? Многие владельцы считают, что замена тормозных колодок на «Калине» (универсал) должна выполнятся практически сразу же после того, как автомобиль куплен и пригнан из салона. Это необходимо из-за того, что большинство моделей, которые сходят с конвейеров отечественных автозаводов, оснащены очень жесткими колодками. Такой элемент негативно влияет на рабочую поверхность диска. Кроме того, это источник противного скрипа приличной громкости. Он неприятен не только для водителя, но и для всех окружающих, когда автомобиль тормозит.

Специалисты считают, что замена тормозных колодок (ВАЗ «Калина» в том числе) должна выполняться, если толщина фрикционной накладки составляет менее 1,5 мм. Ездить с такими колодками просто опасно. Есть серьезный риск того, что в один прекрасный момент эффективность торможения станет практически нулевой. Что касается ресурса, то производители указывают от 20 до 40 тыс. км для передних дисковых тормозов и от 60 до 150 тыс. км для задних.

Необходимый инструмент

Для того чтобы поднять автомобиль, снять колесо, а затем удержать тяжелую машину на весу, пока будет выполняться процесс замены, необходим домкрат.

тормозные колодки калина замена Также для процесса понадобится баллонный ключ, плоская отвертка, плоскогубцы. Дополнительно нужны рожковый и торцевой ключ на 17 и на 13. И еще пригодится струбцина, а также противооткатные упоры.

Важность уровня тормозной жидкости

Прежде чем начать процесс замены, следует обязательно оценить количество данной жидкости. Если уровень ее находится на максимуме, необходимо слить немного при помощи шприца либо груши. Зачем так делать? Это необходимо для того, чтобы в момент отодвигания поршня жидкость не выливалась. Дело в том, что новые колодки значительно толще, чем старые и изношенные.

замена тормозных колодок калина 2 Для хорошего результата нужно оставить в расширительном бачке около половины жидкости.

Этапы работ

Замена передних тормозных колодок на «Калине» (универсал) включает в себя несколько операций. Первым делом ослабляют болты на тех колесах, где проводятся работы. Далее вытягивается стояночный тормоз. При этом под задние колеса «Калины» обязательно подкладывают поры либо кирпичи, чтобы автомобиль не покатился назад. Нужно помнить, что нельзя нажимать на педаль тормоза. Это может спровоцировать выдавливание поршня из тормозных цилиндров.

замена тормозных колодок на калине универсал А что насчет владельцев второй модификации авто? Замена передних тормозных колодок на «Калине» 2-го поколения выполняется аналогичным образом, при помощи тех же инструментов. Далее снимают колесо. Для того чтобы немного облегчить этот процесс, руль выкручивают до упора туда, где будет демонтироваться диск. Это делается для того, чтобы обеспечить более комфортный доступ к тормозному механизму. При помощи ключа на 13 отворачивают болт и поднимают суппорт. Далее отверткой и плоскогубцами отгибают стопорную пластину. При этом ключом на 17 удерживают гайку, чтобы она не проворачивалась.

Теперь устанавливаются новые тормозные колодки («Калина»). Замена сводится к тому, чтобы утопить поршень. При наличии силы это можно сделать и вручную. Однако лучше всего использовать струбцину. Новые колодки устанавливаются в обратном порядке. Самое главное – не забыть о стопорной пластине. Она защищает от откручивания болта. Аналогичный комплекс операций следует проделать и на втором колесе спереди. После того как будет произведена замена колодок, следует снова проверить, сколько тормозной жидкости осталось в расширительном бачке. При необходимости нужно долить до максимального уровня. Зачастую интенсивному износу подвержены именно передние тормозные колодки («Калина»). Замена задних требуется значительно реже, но если это необходимо, то делается это очень легко.

Что нужно для замены?

Для этой операции понадобится немного другой комплект инструментов. Также нужен баллонный ключ для демонтажа колес. Еще пригодится вороток и головка на 30, глубокая головка на 7, тонкая отвертка с плоским жалом и плоскогубцы.

замена передних тормозных колодок на калине 2 
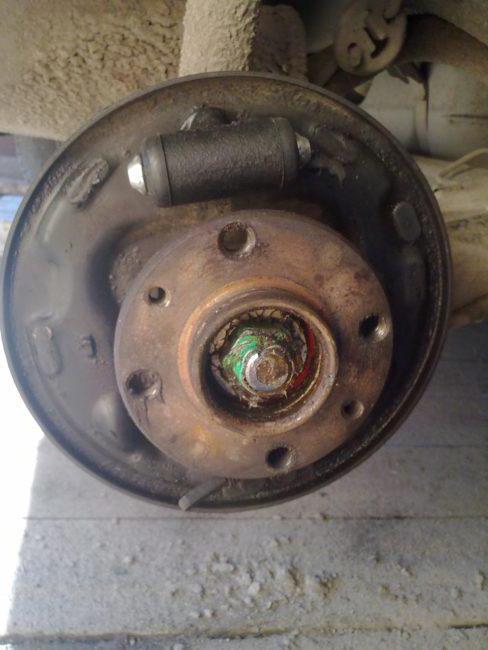
Плоскогубцы могут понадобиться, если не удается демонтировать барабан без обоймы с подшипником. В этом случае сначала отворачивают гайку ступицы, а затем занимаются снятием барабана. На автомобилях “Лада Калина” замена задних тормозных колодок производится в несколько этапов. Рассмотрим ниже, как это сделать.

Как заменить задние элементы своими руками

Автомобиль ставят на передачу, а противооткатные упоры устанавливают уже спереди. Также необходимо упереть одно колесо сзади. Затем машину нужно поднять. Естественно, делается это сзади. Лучше перед подъемом слегка ослабить болты на нужном колесе. Когда оно оторвалось от земли, болты можно отворачивать уже спокойно и уверенно. Затем берется вороток и глубокая головка на 7. С ее помощью отворачиваются шпильки, которые удерживают барабан. После этого можно попробовать снимать тормозной барабан. Чтобы эта операция прошла легче и быстрее, вокруг защитного колпачка брызгают средством WD-40. Когда все откиснет, демонтируем элемент. Можно увидеть весь барабанный тормозной механизм. Далее демонтируется шплинт, это удобнее делать плоскогубцами.

замена передних тормозных колодок на калине универсалДля того чтобы механизм вытянулся, инструмент проворачивают по часовой стрелке и находят удобное положение для него. Затем с помощью плоскогубцев снимают нижнюю пружину, которая стягивает колодки. Это удобнее делать справа – захватывают и тянут в эту же сторону. Затем снимают фиксирующую колодку в центре короткой пружины. Правая колодка легко вынимается без необходимости демонтажа верхней пружины. Для этого крепко берутся за центр плоскогубцами и отводят ее в сторону. Вместе с этим необходимо поднимать пружину вверх. Пластина под пружиной должна выпасть. Теперь уже ничто не фиксирует задние тормозные колодки.

«Калина» (замена дальше выполняется без необходимости применения инструментов) продолжает стоять на домкрате. Достаточно отсоединить фиксирющую пружину и снять пластину. После можно уверенно демонтировать колодку. Установка новых выполняется в обратном порядке. Что касается времени замены, то процесс займет около часа, если в наличии все необходимые инструменты и приспособления. Замена тормозных колодок «Калина-2» выполняется аналогичным образом. Задние механизмы остались такими же, как и в первой версии.

Какие колодки лучше выбрать?

Марка Ferodo является популярность среди отечественных автовладельцев.

замена тормозных колодок ваз калина Колодки лучше приобретать в красной либо в зеленой упаковке. Эти элементы отлично и эффективно тормозят даже на высоких скоростях. Колодки от Dafmi отличаются высокой стойкостью к износу, отлично выдерживают экстренные торможения в любых даже самых неблагоприятных погодных условиях. Ресурс небольшой – всего 30 тыс. км. Для тех, кто любит ездить экстремально, подойдет продукция Sangsin. Эта компания предлагает продукцию, которая отличается высоким ресурсом. Данные элементы могут работать даже в условиях экстремальных температур.

Заключение

К тормозам не стоит относиться безответственно. Необходимо вовремя проверять тормозные колодки. «Калина» (замена, как видите, легко производится своими руками) будет исправно и безопасно ездить ближайшие 25 тысяч км.

Замена передних тормозных колодок на калине

Добро пожаловать!
Передние тормозные колодки – являются важной составляющей тормозного механизма и за очень короткое время (По сравнению с задними колодками) приходят в негодность, всё это связано с тем что при торможении весь вес автомобиля передаётся на его переднюю часть и поэтому передние тормозные колодки подвергаются очень большим нагрузкам, так же они быстро нагревают передние тормозные диски но и остывают по времени тормозные диски тоже относительно быстро (Особенно при езде), вот таким вот образом и работают передние тормозные колодки.

Примечание!
Чтобы сменить колодки на автомобиле, вам придётся запастись: Плоской отвёрткой, а так же зубилом, молотком и набором гаечных ключей в котором быть у вас должны ключи под номером «13» и «17»!

Краткое содержание:

Где находятся передние тормозные колодки?
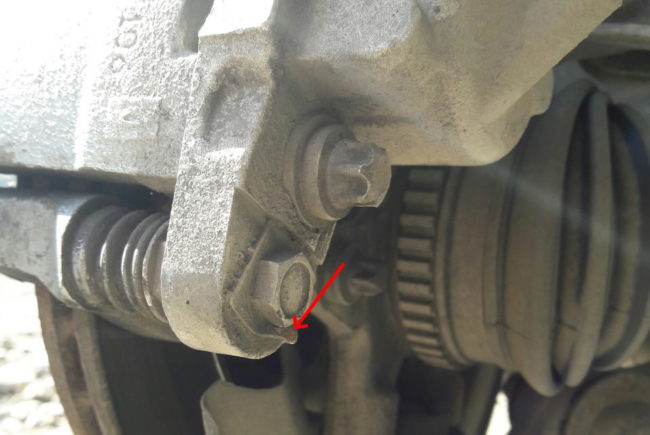
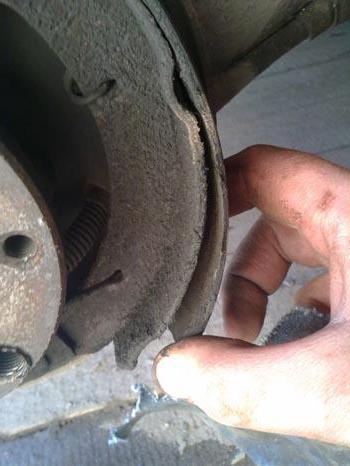
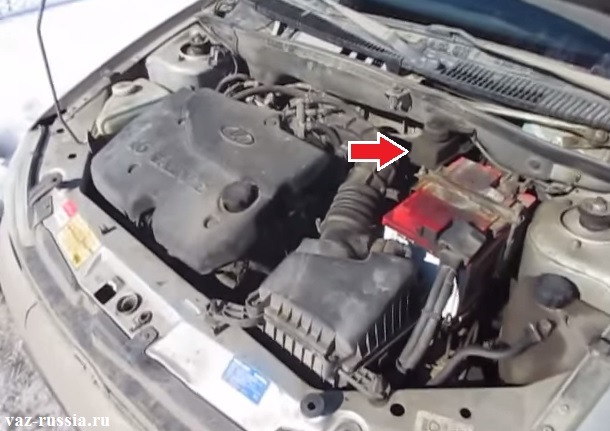
В каждом автомобиле есть тормозной суппорт (Правда не во всех эти суппорта есть, вот к примеру если брать машины с барабанными тормозами, то там эти суппорта отсутствуют), на каких то он в передней части располагается, а на каких то и в передней и в задней, на АвтоВАЗе машин с задними дисковыми тормозами выпускается очень мало (Но они всё же есть, та же самая калина NFR к примеру), а выпускается мало потому что задние тормоза как мы уже сказали особой роли при торможении не играют, тем более двигатели на наших автомобилях не слишком мощные и барабанные тормоза заднюю часть при торможении тоже на ура удерживают, плюс дисковые тормоза нужно чаще менять и колодки в них тоже требуют частой замены, ко всему этому дисковые тормоза более дорогие в обслуживании в отличие от барабанных и чтобы их установить тоже денег больше нужно и поэтому автомобили в цене возрастут при покупки, а чем больше стоит автомобиль, тем меньше спрос на него (Не богатые люди просто не смогут его уже купить) и поэтому такие тормоза применяются на ВАЗах только в передней части, для наглядности на фото ниже в круг обведён сам тормозной суппорт, а стрелкой показана щёль, в которую если заглянуть, можно будет увидеть тормозные колодки.

Местонахождение тормозного суппорта и тормозных колодок показано на фотоМестонахождение тормозного суппорта и тормозных колодок показано на фото

Когда нужно менять передние тормозные колодки?
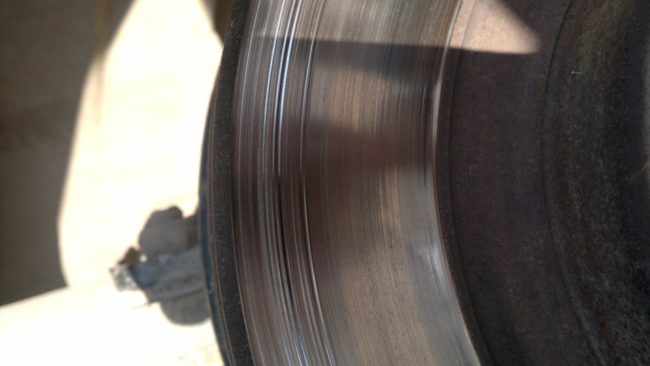
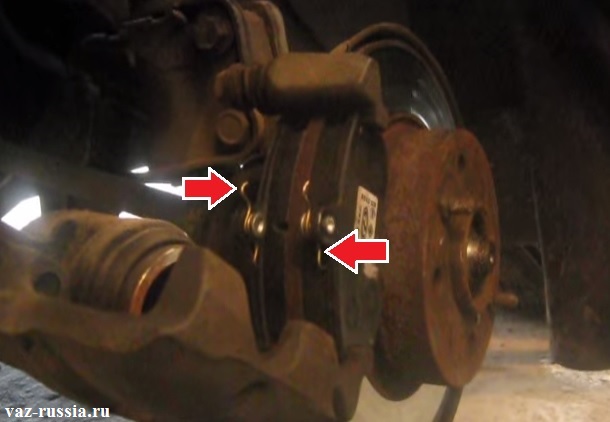
Не сняв и не проверив колодки сказать с точностью что их нужно менять у вас не получиться, потому что как правило когда колодки приходят в негодность, они о себе не сразу дают знать (Только если они совсем не стёрлись до металла, в этом случае тормозить данное колесо на котором стёрлись колодки до металла не будет и будет очень неприятный звук при торможении стоять, как будто металл об металл трётся, вы его сразу услышате), по началу появляется посторонний звук (Скрежет лёгкий) со временем он всё усиливается и усиливается, но и проявляется он только когда автомобиль тормозит, если и у вас все эти симптомы присутствуют, то в таком случае снимайте колесо с автомобиля и через ту самую щель в тормозном суппорте, посмотрите состояние колодок, если вы уже видите что их фрикционная часть (Данная часть указана стрелками) стёрлась и практически дошла до основания на котором она сидит, то в этом случае снимайте колодки и меняйте их на новые, так к слову, фрикционная часть тормозных колодок не должна быть меньше 1.5 мм, это всё линейкой или штангенциркулем измерить можно когда колодки будут сняты с автомобиля, но только именно фрикционную часть меряйте и основание к которому она крепиться вообще не берите в расчёт.

Фрикционная накладка тормозной колодкиФрикционная накладка тормозной колодки

Примечание!
Кроме этого колодки так же меняются если фрикционная накладка у них повреждена, если на ней имеются сколы и трещины, а так же если накладка начала отваливаться от основания к которому она прикреплена, более подробно о том что такое тормозные колодки, где они располагаются и как работают, можете ознакомиться в статье под названием: «Что такое тормозные колодки?»!

Как заменить передние тормозные колодки на ВАЗ 1117-ВАЗ 1119?

Примечание!
Колодки заменяются только комплектом и ни как иначе, то есть если вы собрались спереди колодки менять, то на обоих колёсах все четыре колодки и меняйте, если сзади нужно их сменить, то же самое, на обоих задних колёсах их и меняйте, всё это связано с тем что все колодки разные и какие то сильнее тормозят а какие то слабее и если вы замене колодки только на одном колесе, а на другом будут изношенные и совершенно другой фирмы, то в лучшем случае при торможении у вас автомобиль в бок будет уводить, а в худшем, его в занос будет бросать, потому что одно колесо будет гораздо сильнее тормозить другого!

Снятие:
1) На всех автомобилях которые выпускаются на ВАЗе колодки заменяются практически идентично и разницы особой нет, поэтому если вы научитесь на калине их менять, то и на девятке и на десятки вы тоже сможете эту процедуру проделать, в начале нужно будет снять нужное колесо тем самым чуть-чуть приподняв машину, для безопасности рекомендуем под задние колёса башмаки ещё подложить чтобы автомобиль чётко держался на весу и ручным тормозом машину ещё затормозить нужно (Кстати при замене задних колодок, ручник наоборот должен быть опущен, поэтому на будущее это учтите если задние колодки соберётесь заменять), если вы не умете снимать колесо или просто не знаете как это правильно нужно делать, в таком случае изучите статью: «Правильная замена колёс на автомобилях» и ещё кой что, тормозной бачок проверьте (Он указан стрелкой), а именно посмотрите сколько в нём жидкости налито, если он полностью заполнен, тогда с помощью резиновой груши откачайте от него чуть-чуть жидкости, просто когда вы поршни будете обратно утапливать которые в суппорте находятся, жидкость будет выходить и если тормозной бачок забит будет, то жидкость просто польётся наружу и двигатель запачкает вам.

Местонахождение тормозного бачка в подкапотном пространствеМестонахождение тормозного бачка в подкапотном пространстве

Примечание!
Если жидкость придётся немного собирать при помощи медицинского шприца или резиновой груши, то ещё клемму минус скиньте, а то если жидкость на аккумулятор попадёт, то замыкание будет, о том как скинуть клемму с АКБ, читайте в пункте 1 «вот этой статьи»!

2) Теперь переходим к самой замене, у скобы тормозного суппорта есть болты её крепления, один из болтов вам будет нужно вывернуть, чтобы поднять скобу и снять колодки, но чтобы отвернуть этот нижний болт нужно отогнуть уголок стопорной шайбы которая предотвращает выворачивания этого болта при езде на автомобиле, отогнуть его можно с помощью отвёртки или же зубила (см. фото 1), как только операция проведена, отверните нижний болт придерживая при этом вторым ключом направляющий палец от проворачивания (см. фото 2), далее поднимите скобу у суппорта до упора на самый верх (см. фото 3) и выньте обе тормозные колодки, заменив при этом их на новые, по необходимости проверьте линейкой или же штангенциркулем фрикционные накладки тормозных колодок и при установке новых колодок, всё посадочное место от грязи и ржавчины протрите, при помощи металлической щётки к примеру, но только во время очищения суппорта, пыльник у поршня не порвите, а то менять придётся, в общём делайте всё аккуратно и в завершение, поставьте одну старую тормозную колодку на своё место и закройте суппорт (Болт направляющего пальца заворачивать не нужно), как только колодку установите на место, возьмите толстую отвёртку или небольшую монтировку и использовав их как рычаг, вдавите поршень во внутрь тормозного суппорта, поршень нужно вдавливать чтобы новые колодки установились, просто новые они по толще будут и если поршень не вдавить, то при установки колодки просто в него упираться будут, после завершения операции, выньте старые колодки и установите на их место новые.

Выпрямление уголка стопорной шайбы и выворачивание болта направляющего пальца, а так же поднятие скобы суппорта и утапливание поршня при помощи старой колодкиВыпрямление уголка стопорной шайбы и выворачивание болта направляющего пальца, а так же поднятие скобы суппорта и утапливание поршня при помощи старой колодки

Примечание!
Перед тем как скобу суппорта поднимать, тормозной шланг выньте из кронштейна в том месте которое стрелкой на фото ниже показано, таким образом вы обезопасите его и он при поднятии скобы не порвётся!

Вынимание шланга из отверстия в телескопической стойкиВынимание шланга из отверстия в телескопической стойки

Установка:
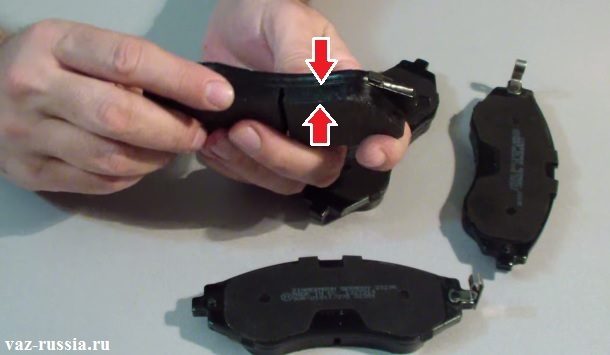
Устанавливаются новые колодки в обратном порядке снятию, при установке проследите за тем чтобы нажимные пружины параллельно самим колодкам были установлены как это на фото ниже показано (Пружины указаны стрелками), а так же когда закрутите болт направляющего пальца (Кстати палец придерживать другим гаечным ключом не забудьте, а то он вместе с болтом проворачиваться будет), загните тот самый усик стопорной шайбы который вы ранее отгибали зубилом или отвёрткой, загибать его нужно таким образом, чтобы болт отвернуться не мог, в общём разберётесь, просто головой подумайте немного, в завершение когда всё будет уже закончено, сядьте в машину и несколько раз на тормоз нажмите, ещё проверьте уровень тормозной жидкости в бачке и если будет нужно до доведите его до нормы и всё на этом.

Правильно установленные тормозные колодкиПравильно установленные тормозные колодки

Дополнительный видео-ролик:
Увидеть наглядно каким образом колодки заменяются на автомобиле, вы можете в видео-ролике ниже, в котором пример замены показывается на автомобиле Лада Калина 2.

90000 How to Replace Front Brake Pads and Rotors in Under 90 Minutes 90001 90002 ASE certified mechanics have created this instructional guide including a video on the replacement of your car’s front brake pads and rotors. 90003 90004 Brake Pad and Rotor Replacement Summary 90005 90006 90007 Resetting the brake caliper 90008 90007 How to remove brake caliper 90008 90007 Removing a caliper mount 90008 90007 Removing the brake rotor 90008 90007 Matching up the old rotor to the new unit 90008 90007 Installing the new brake rotor 90008 90007 Replacing brake pads 90008 90007 Servicing the caliper slides 90008 90007 Reinstall the caliper mount 90008 90007 Bolting up the caliper 90008 90007 Setting the brake pads 90008 90029 90004 How Long Do Brake Pads Last? 90005 90002 Front brakes typically do not last as long as rear brake because they take most of the job of stopping the car.Depending on driving habits and the design of the car front brake should last between 20,000 and 35,000 miles. 90003 90004 How Much Do They Cost? 90005 90002 If you were to have the brake job done that include new pads and rotors at a repair garage it would typically cost between $ 245.00 and $ 430.00 US currency in most cases excluding exotic cars. You can get pads and rotors for about $ 110.00 to $ 140.00 US at Amazon or pay a little more at the parts store. Hybrid and electric cars will go much longer on a set of brakes because the electric motor does most of the stopping to recharge the batteries.90003 90002 SPONSORED LINKS 90003 90004 What Goes Wrong? 90005 90002 The brake pads, rotors and calipers are a normal wear item on all cars and responsible for slowing and stopping the car once it is in motion. If these items are neglected it can cause serious implications when applying your car’s brakes due to the lack of brake material (metal on metal). An indication for brake replacement is a squeaking or grinding noise when you hit the brakes.Also a chirping sound when the vehicle is rolling without the brakes being applied or a brake system warning light on which indicates the brake fluid is low. Low brake fluid is an indication of needing brake pads because the fluid displaces the missing pad material in the calipers. 90003 90004 Watch the Video! 90005 90002 Here is the video of the job getting done. After watching please continue down through the guide to gain additional information which is updated regularly.90003 90002 90049 90050 90003 90004 Front Brake Replacement 90005 90002 This guide includes both front wheel and rear wheel drive vehicles which use a bearing hub or old style serviceable wheel bearing set ups. Only remove one caliper and complete the brake replacement on one side at a time. 90003 90056 Step 1 90057 90002 90059 Identity Brake Components: 90060 A disc brake system consists of a brake rotor, caliper, caliper mount and an inner and outer pad set which is held inside of the caliper (wheel removed).90003 90002 90063 90003 90002 SPONSORED LINKS 90003 90056 Step 2 90057 90002 90059 Reset the Brake Caliper: 90060 With the ignition key in the unlock position grasp the caliper and turn it outward to gain access to the mounting bolts. Then locate the brake caliper bleeder screw which is toward the top and remove the dust cap. The fluid that is in the caliper could be contaminated and may contain small dirt, metal or rust particles.90003 90002 When pushing the piston back into the caliper this contaminated fluid can cause problems for the ABS valve, motor and master cylinder which can cause these components to fail. This step is to allow the brake fluid that has entered the brake caliper in place of the worn brake pads to be removed. 90003 90002 90076 90003 90002 Use a small wrench in most cases an 10mm and fit it over the bleeder valve. Next attach a piece of rubber tubing or hose over the bleeder valve while the other end of the hose is sitting in a fluid container.Push the wrench counterclockwise to open the valve (rubber tube optional). 90003 90002 90081 90081 90003 90002 SPONSORED LINKS 90003 90002 Once the bleeder is open use a small pry bar or large flat blade (standard) screw driver to wedge it between the rotor and old brake pad. Then start applying pressure back and forth to widen the gap while pushing the piston back into the caliper. Fluid will start to flow from the tube and into the container.Continue this operation until you can not push the piston any further back into the caliper. While holding pressure on the piston close the bleeder valve then remove the hose and wrench. 90003 90002 On some calipers is it difficult to reset the caliper in the fashion so this step will need to be done after the caliper has been removed using a large C clamp or channel locks. If channel locks are used install an old pad to help protect the caliper piston. 90003 90002 90091 90091 90003 90056 Step 3 90057 90002 90059 Remove the Brake Caliper: 90060 Locate the caliper mounting or slide bolts on the inside of the caliper.The bolt head sizes can either be 14mm, 15mm, 18mm, 8mm or 10mm hex drive, or a 35 torx bit in most cases. (Some Volkswagen’s use their own special 12mm or 14mm ten point torx to keep you from doing the brakes with normal tools, you must have this special tool to the job) Use a ratchet or wrench to loosen and remove both bolts by turning them counterclockwise. 90003 90002 You might need an additional wrench to hold the caliper slide from turning but this is not typical.Once removed inspect the condition of the threads and replace them if worn. 90003 90002 90103 90103 90003 90002 SPONSORED LINKS 90003 90002 Now the caliper will be loose. Grasp it to remove the caliper from the brake pads and the caliper mounting bracket. If the caliper has not been retracted you may need to rock the caliper back and forth a little to remove it. Once the caliper is free from the pads set it securely on the lower control arm, strut bulk head or use a zip tie to hold it out of the way.Be careful not to bend, kink or allow the caliper to hang from the brake flex hose. 90003 90002 Thoroughly inspect brake caliper and brake hose for leakage, cracks or chaffing and replace it if needed. 90003 90002 90113 90113 90003 90056 Step 4 90057 90002 90059 Remove the Brake Pads: 90060 Once the brake caliper has been removed grasp the inner and outer pads and slide them outward from the rotor and out of the caliper mounting bracket. You can use a standard screw driver and wedge it between the pads and the rotor to help in the removal.Sometimes the pads will get stuck on the caliper upon removal which you can then pop them out from the caliper to remove. 90003 90002 90123 90123 90003 90002 Inspect the worn pad and silencer shim. Look for uneven wear which is an indication of a seized caliper slide which will need to be serviced. We will show you how to do this later on in this guide. 90003 90002 90129 90129 90003 90056 Step 5 90057 90002 90059 Remove the Caliper Mounting Bracket: 90060 The caliper mounting bracket must be removed to replace the brake rotor in most cases.Locate the mounting bolts on the inner part of the bracket. The bolt head size will be larger than the caliper mounting bolts such as 17mm, 18mm or 19mm in most cases. These bolts can be held in with thread lock so make sure the socket or wrench is on securely before applying pressure counterclockwise to remove them. 90003 90002 SPONSORED LINKS 90003 90002 90141 90141 90003 90002 When removing the last bolt the mounting bracket will become loose so keep your hand on it so it does not fall.This bracket will contain the caliper slides which will need to be removed and cleaned before reassembly. These slides help the caliper float to ensure that both inner and outer brake pads wear evenly. Now the brake rotor is ready to be removed. 90003 90002 90147 90147 90003 90004 Brake Rotor Replacement 90005 90002 A brake rotor is designed to utilize brake pressure provided by the brake system to stop the car. This brake rotor utilizes friction and heat to convert momentum into stopping power.Brake pads ride against either side of the brake rotor and are held in place by the brake caliper. 90003 90004 What Goes Wrong? 90005 90002 Brake rotors can either be solid or ventilated depending on the application design. Replacement costs for brake rotors have come way down in recent years and replacing them has become the preferred method over resurfacing. There is a minimum thickness measurement requirement designed to uphold rotor performance integrity. Once a rotor reached this minimum measurement it must be discarded or it can warp causing the steering wheel to shake when the brakes are applied.90003 90002 A brake rotor is only capable of holding a specific amount of heat. Once this level is reached the brake rotor can not hold additional heat causing the brakes to fade. Brake fade is a condition that will hinder the brake performance until the brake rotor has cooled. If a brake rotor is subjected to prolonged overheating conditions it can destroy the rotor by crystallizing the rotor’s metal causing hot spots which will create a grumbling sound when the brakes are used.90003 90002 SPONSORED LINKS 90003 90002 A brake rotor’s surface can become uneven and have groves in it as the brake pads wear which is a natural occurrence. New brake pads are perfectly flat and need a flat surface to mate against. If new brake pads are installed onto a worn brake rotor it can cause weak brake operation and squeaking. This can cause the brake pedal or steering wheel to pulse when the brakes are applied. 90003 90002 It’s not a good idea to install new brake pads on an old brake rotor because the braking surface will be uneven and will diminish the brakes ability which can make the car pull one way or the other when braking.This is known as «slap pads on it» and is the very cheapest way to do a front bake job. 90003 90056 Step 1 90057 90002 90059 Replace the Brake Rotor: 90060 Some brake rotors are held to the bearing hub with a mounting screw or sheet metal clip on the wheel stud. Use a screwdriver or impact screwdriver to remove the screws. There also may be sheet metal clips that can be removed with a pair of side cutters (dikes). These clips can then be discarded. 90003 90002 90173 90173 90003 90002 These mounting screws can be on there pretty tight in which case you must use an impact screwdriver which looks like this and is available from Amazon or you can rent it from the parts store which is pretty cheap.90003 90002 90179 90179 90003 90002 While wearing safety goggles use a hammer and strike the end of the impact screwdriver which will unlock the screw and make it more easily removed. The impact screwdriver has two settings, tighten and loosen so make sure you have it on the correct setting. 90003 90002 SPONSORED LINKS 90003 90002 90187 90187 90003 90002 After removing any mounting screws or clips the rotor should be loose. Sometimes the rotor can be stuck due to rust and the fact the wheel is tightened against it and the bearing hub.While still wearing safety goggles use a plastic or regular hammer to shock the rotor loose for removal. This can take some force so do not be afraid to give it a good strong strike of a metal hammer. 90003 90002 90193 90193 90003 90002 Once the old brake rotor has been removed match it to the new rotor. Check the outer diameter and mounting offset along with the wheel stud location, they should be an identical match. Some people like to re-machine rotors using a brake lathe.We recommend new ones because the re-machined rotors will have less metal to dissipate heat with which can make them warp. This condition will make the steering wheel shake when applying the brakes. 90003 90002 90199 90199 90003 90002 Use a shop towel and wipe off the mounting surface of the bearing hub and make sure it’s free from dirt and grease. This will allow the new rotor to sit squarely on the bearing hub. Once the old rotor has been matched to the new unit, align the wheel studs and rotor mounting screws.Then slip the rotor onto the bearing hub. 90003 90002 90205 90205 90003 90002 SPONSORED LINKS 90003 90002 Install the rotor mounting screws and tighten. You do not need to use the impact screwdriver to make the screws super tight at this point because the rotor will be held on by the wheel and lug nuts. 90003 90002 90213 90213 90003 90002 On older cars and light trucks the rotor will house the axle bearings and grease seal which will need to be cleaned and repacked (Serviced).90003 90004 Service the Caliper Slides 90005 90002 The caliper sides are designed to allow the caliper to float while being bolted to the mounting bracket which helps the brake pads wear evenly. 90003 90004 What Goes Wrong? 90005 90002 When brake caliper slides become stuck due to rust and corrosion the car can pull while braking which causing one pad to wear excessively compared to the opposite pad in the caliper. It can also cause the brakes not to release once applied and create excessive heat.90003 90002 SPONSORED LINKS 90003 90056 Step 1 90057 90002 90059 Remove the Slide Bolts: 90060 Grasp the slides and pull them outward while twisting this will help break the dust boot seal loose. Continue to work the slides outward until they come free from the mounting bracket. If a slide is stuck or seized in the bracket use a vise to hold the bracket and a pair of pliers to work it loose by moving it back and forth while applying WD40 and pulling them outward.90003 90002 90235 90235 90003 90002 Use a shop towel carburetor or brake cleaner and a wire brush to clean all rust and corrosion from the slides. Check the slide bolts for wear and replacement them if excessive wear is observed. 90003 90002 90241 90241 90003 90002 Once the slides have been cleaned apply a thin layer of silicone brake lube to both slides. Some slides will have a dampener on one end be sure to not get these mixed up. Install them back into the hole they came out of.90003 90002 90247 90247 90003 90002 SPONSORED LINKS 90003 90056 Step 2 90057 90002 90059 Reinstall the Slides and Caliper Mount: 90060 Install the caliper slides into the caliper mounting bracket with a twisting motion and make sure the slides move easily in the out. If not, remove the slide for more investigation. These slides can become worn and have groves in them in which case they will need to be replaced. Slide pin grooves can cause the caliper to hang which will create uneven pad wear and braking characteristics.90003 90002 90259 90259 90003 90002 Before reinstalling the caliper mounting bracket clean the threads of the bolts by using a small wire brush. Then hand thread in both mounting bolts into the bracket. Tighten the bolts evenly to manufacturer’s specifications which is usually between 70 and 90 foot pounds. A small amount of thread lock can be used to ensure the bolts do not come loose. 90003 90002 90265 90265 90003 90004 Install New Brake Pads 90005 90002 Once the caliper has been removed and the rotor replaced you are ready to install the new brake pads.90003 90004 How Do Brakes Pads Work? 90005 90002 Brake pads are designed to absorb heat as they create friction against the brake rotor when the brake pedal is activated. These pads ride against either side of the rotor which are held in place by the brake caliper which is typically mounted to the spindle or backing plate. Hydraulic pressure is provided by the brake system via a brake master cylinder. When the brake system is activated the brake pads are forced against the brake rotor causing it to slow down the motion of the car.90003 90002 Brake pad backing plates are made of metal and there are several different classifications of the brake pad composites for example; organic, semi metallic and ceramic to name a few. The organic pad is used mainly for stock applications. The semi metallic is used for trucks and SUV’s while the ceramic pad is used for extended life applications. Each of these pads possess individual wear and usage characteristics for example; organic pads are the most forgiving pad when it comes to brake rotor wear and tend to make less brake noise such as squeaking.90003 90002 Semi metallic pads tend to be more abusive to the rotors but can take more heat then organic pads before brake fade occurs. Ceramic pads are the hardest pad of the group and can wear out the rotors over the life of the brake pad. Ceramic pads can also be associated with brake noises such as squeaking and grumbling. The advantage of the ceramic pads is the lifespan of the brake pad set is about 20% longer than a regular brake pad. Every brake pad manufacturer has their own mixture of composite material that can vary in cost and quality.This material is bonded or riveted to the pad’s metal backing plate. 90003 90056 Step 1 90057 90002 90059 Install the Pads: 90060 When replacing the brakes always match the old brake pads to the new brake pads. The backing plate of the brake pad should be identical to the old except for the missing composite material. Some pads are fitted with anti rattle clips. These clips are design to allow the pads to move freely within the caliper mount. 90003 90002 If these clips are not included with the brake pad set transfer the old clips to the new brake pad set.Do not discard the anti rattle clips this will result in the pad having excessive clearance which will create a popping or clicking sound when the brakes are applied. Some brake pad designs will include a screamer style of wear indicator. This minimum thickness indicator was created to make a chirping or screaming noise when the brakes are in the idle position or when the brakes are applied. 90003 90002 SPONSORED LINKS 90003 90002 In an effort to help keep the brake pad in place car manufacturers have designed built in outer clips that hold the pad to the inside and outside of the caliper.The inboard pad clip fits inside the caliper piston while the outboard pad clip attaches to the outer part of the caliper. These clips hold the brake pads into the brake caliper. 90003 90002 In the example below you can see the pad screamer which is what creates the squeaking or chirping noise when your brakes are getting low. This safety device is to warn you the brakes need replacing. 90003 90002 At the upper side of the pad you can see metal which coins the phrase «my brake are metal to metal «meaning the backing plate of the pad which is made of metal is contacting the rotor which is also metal.When brakes are in this condition the stopping power is greatly compromised. 90003 90002 90297 90297 90003 90002 Compare the old pad to the new one and pay special attention to the size of the pad’s backing plate tang. These tangs are what hold the pad in place. If the tang is too large it will not fit into the caliper mounting plate and if the tang is too small the pad will rattle and click when driving or stopping. Also the screamer warning tab needs to be in the same place as the old pad when installed back into the mounting bracket.90003 90002 90303 90303 90003 90002 Match the old pad backing plate size to the new pad. Some new pads have an anti-squeak vibration shim already attached to the rear of the backing plate so no additional measures to stop brake squeak is needed before installation. In older application an anti-squeak spray or coating was used but usually had little to no effect on stopping brake noise. 90003 90002 90309 90309 90003 90002 In some applications new an anti-rattle clip sets are supplied with the pads.Remove the old retainer clips and install the new ones onto the caliper mounting bracket. 90003 90002 90315 90315 90003 90002 SPONSORED LINKS 90003 90002 When installing pad anti-rattle clips into the caliper mounting bracket make sure the orientation of the clips are correct. 90003 90002 90323 90323 90003 90002 Install the new pads one at a time. Push down on the spring retainer clip and nose the top of the pad inward to rest it squarely against the rotor.90003 90002 90329 90329 90003 90002 This is what it looks like when both pads are correctly installed against the brake rotor. Make sure the pads move freely within the bracket with no access play. The caliper is now ready to be reinstalled. (Note: The pad with the sensor is usually in the inboard position). 90003 90002 90335 90335 90003 90056 Step 2 90057 90002 90059 Reinstall the Brake Caliper: 90060 While holding the caliper slides inward gently set the caliper over the brake pads.If you have difficulty getting the caliper in place double check to make sure the piston is fully retracted into the caliper and the slides are pushed into the mounting bracket. Double check the piston position with a large C clamp or channel locks and push the piston inward. 90003 90002 90345 90345 90003 90002 Once the caliper is successfully over the pads and slides install both mounting bolts by hand one at a time. Then tighten the bolts to manufacturers torque specification which is usually 35 to 45 foot pounds.Some slides have a hex where a wrench can be used to hold the slides from turning while tightening the bolt. Now completed repeat this brake job procedure for the opposite side of the car. 90003 90002 90351 90351 90003 90056 Step 3 90057 90002 90059 Adding Brake Fluid: 90060 Open the hood and locate the brake master cylinder which is usually on the driver’s side near the firewall. Use a shop towel and clean the brake master cylinder reservoir and lid to ensure no dirt falls into the fluid then remove the lid so fluid can be added.90003 90002 90361 90361 90003 90002 Add brake fluid from a sealed container until the level meets the «FULL» line on the reservoir. 90003 90002 90367 90367 90003 90002 Once the fluid has been installed to its proper level reinstall the lid and wipe an excess brake fluid with a shop towel. After the brake pedal has been pushed down and proper brake pressure has been obtained recheck the fluid level and re-add if needed. 90003 90002 90373 90373 90003 90056 Step 4 90057 90002 90059 Push Down On the Brake Pedal Slowly: 90060 Once the opposing side is complete double check your work to make sure all bolts are on and tight.Slowly push the brake pedal downward, the pedal will go to the floor. Then allow it back up very slowly, never pump the brakes quickly. Repeat this operation until you feel the brake pedal become normal and have pressure. This can take four to seven cycles. 90003 90002 This operation is forcing the brake pads to travel to the brake rotors while taking up the air gap between the pad, rotor and caliper piston. Do this until normal brake operation has returned (brake pedal is in its normal position).Moving the pedal slowly helps prevent air bubbles being trapped in the system which alleviates bleeding. If the pedal seems spongy air is trapped and the brake system needs bleeding. 90003 90002 90385 90385 90003 90056 Step 5 90057 90002 90059 Breaking In the Brake pads and rotors: 90060 After a brake service has been performed and the car is safety on level ground recheck the brake pedal operation. This should be done with the car running and in park to aid the power brake system.When first using the new brakes they will not work as good because they have not been broken in yet this means the pads have not mated to the rotor. To do this properly take the car for a test drive use the brakes gently while doing easy stops. Then releasing the pedal monetarily and then reapply it while stopping. 90003 90002 This will break in the pads while allowing them to cool and release any brake material disbursed in the process. Repeat this procedure 5 to 7 times at this point the brakes are ready for the open road and the brake pedal operation should be normal.If you hear any strange noises or the pedal is soft or spongy recheck the job by re-jacking the car up and removing the wheels of inspection or re-bleeding the system. Never continue to drive a car without normal brake pedal operation. 90003 90004 Got Questions? 90005 90002 If you have any questions brakes please visit our forum. If you need car repair advice please ask our community of mechanics is happy to help and always 100% free. 90003 90002 Article published 2018-06-06 90003 .90000 Volkswagen Golf GTI Mk V Front Brake Pads Replacement (2006-2009) 90001 90002 Like many modern manufacturers Volkswagen shares components and even platforms across its many model lines. This article is based on one of those shared components but the work may have been performed on a different model than your vehicle. While some fasteners and other hardware types and sizes may be different, all of the information you need to safely complete the project is included in this article.If you have any questions, comments or feedback please contact us using the comment section below or join us on one of the world’s best automotive forums for additional assistance. 90003 90002 Replacing your brake pads is a very easy job to perform on your Volkswagen GTI MkV and a great way to get started on ‘Doing it yourself «. In general, you should inspect your brake pads and rotors about every 25,000 miles, and replace them if the material lining of the pad is worn down enough to trigger the pad replacement sensor or there is less than a quarter inch of material on the pad.In reality, most people do not inspect their pads very often, and usually wait until they see the little brake-warning lamp appear on the dashboard. ‘ It’s a wise idea to replace the pads, and inspect your discs as soon as you see that warning lamp go on. 90003 90002 If you ignore the warning lamp, you may indeed get to the point of metal on metal contact, where the metal backing of the pads are contacting the brake discs. ‘ Using the brakes during this condition will not only give you inadequate braking, but will also begin to wear grooves in your brake discs.’Once the discs are grooved, they are damaged, and there is often no way to repair them.’ Resurfacing will sometimes work, but often the groove cut will be deeper than is allowed by OEM specifications. ‘ If your pads are grabbing or pulsing when you come to a stop, there is a very good chance your rotors are warped and in need of replacement as well. 90003 90002 First thing you need to do is get the car up on jack stands and the front wheels removed. Please refer to our article on jacking up your car for more information.Be sure to wear safety goggles anytime you work under your vehicle. 90003 90010 90011 90012 90002 Figure 1 90003 90015 90016 90002 Before you begin working on the brakes, check your brake fluid reservoir. You will need to compress the caliper piston, which will cause brake fluid to travel back up into the reservoir. You need to make sure there is room for it (red arrow). Carefully clean around the reservoir before you open it, as you do not want any dirt or debris getting into it.Be prepared to use a turkey baster or fluid pump to extract some of the brake fluid if necessary. Make sure whatever you use is clean; you do not want any contaminants getting into the fluid. 90018 90003 90015 90021 90011 90012 90002 Figure 2 90003 90015 90016 90002 Disconnect the wear sensor from the harness (red arrow). 90018 90003 90015 90021 90011 90012 90002 Figure 3 90003 90015 90016 90002 Place a large flat head screwdriver between the caliper and retaining clip (red arrow).Pry the clip from the caliper and set it aside. Use caution when removing the clip as it is under pressure. 90018 90003 90015 90021 90011 90012 90002 Figure 4 90003 90015 90016 90002 There are two 7mm Allen bolts holding the caliper to the mounting bracket. They should be covered with plastic caps but our project car did not have them. If yours have them remove the covers. Then remove the 7mm Allen guide bolts (red arrows). 90003 90015 90021 90011 90012 90002 Figure 5 90003 90015 90016 90002 If you are reusing your guide bolts check them for wear and tear (red arrow).It is a good idea to clean them up with a scotch brite pad and put a little white lithium grease on the smooth guide part of the bolt (red arrow). 90003 90015 90021 90011 90012 90002 Figure 6 90003 90015 90016 90002 Pull the caliper back off the rotor (red arrow). Sometimes the brake pad will stay in the mounting bracket on the exterior pad (yellow arrow) and sometimes it comes off with the caliper. If the caliper is really stuck you can push it in on the piston side, compressing the piston and giving you more room to wiggle it off.90018 90003 90015 90021 90011 90012 90002 Figure 7 90003 90015 90016 90002 With the caliper off you can see the two brake pads (green arrows) along with the one brake wear sensor (yellow arrow). Do not forget to check the condition of the rubber boot protecting the caliper piston (red arrow). 90018 90003 90015 90021 90011 90012 90002 Figure 8 90003 90015 90016 90002 The inner pad has a clip (red arrow) that inserts into the caliper piston.90018 90003 90015 90021 90011 90012 90002 Figure 9 90003 90015 90016 90002 The new pads will be thicker than the old ones and will necessitate pushing the brake piston back into the caliper to make room to get them over the disk. As inPicture 1 make sure there is room for the brake fluid to move back into the reservoir. Next, use a large C-clamp (yellow arrow) and one of the brake pads (red arrow) and compress the piston (green arrow) back into the caliper. Installation is the reverse of removal.If your pads do not come with a peel off anti squeal pad on the back you may want to apply a little anti squeal paste to the back of the pads. Top up the brake fluid and put the cap back on the reservoir. Make sure to pump the brakes a few times before driving. Brake pads need to be ‘seated correctly’ to avoid damage and give you maximum performance and durability. Please follow the break in instruction that comes with your new brake pads. 90003 90015 90021 90107 .90000 Disc Brake Pad Removal & Installation 90001 90002 This article will discuss brake pad replacement on bicycle disc brake systems for both mechanical and hydraulic systems. 90003 1 90004 Preliminary Info 90005 90006 When to replace brake pads 90007 90002 Pads should be replaced if they are worn out, contaminated, or to change pad material for performance reasons. 90009 90003 90011 Wear 90012 90002 Generally, the pad material should measure at least 1mm thick.By stacking 3 business cards you can create a makeshift feeler gauge that is approximately 1mm. 90003 90015 Brand new pad showing more than 1mm of pad life 90016 This severely worn pad needs replacement 90002 Check with the pad manufacturer for exact wear specifications, and use a caliper for accurate measurements.90003 90011 Contamination 90012 90002 Contaminants such as brake fluids, oils or grease can ruin your pads, but they’re not always easy to see. Contaminated pads may cause problems such as a squeal, extra effort at the lever to slow down, or a darkness on the rotor and pads that smears when rubbed with a finger. 90003 90002 Always look for the source of the contamination. Some common sources are overspray from aerosol lubricants, or a leak in the hydraulic system. 90003 90025 This contaminated rotor leaves an oily smear when wiped with a finger 90006 Pad Material 90007 90002 Pads come in different materials — metallic, organic, and semi-metallic — each with their own advantages and disadvantages, as seen in the chart below: 90003 90030 90031 90032 90033 90034 Organic 90035 90034 Semi-Metallic 90035 90034 Metallic 90035 90040 90041 90042 90032 90044 Brake Noise 90045 90044 90047 90045 90044 90050 90045 90044 90053 90045 90040 90032 90044 Initial Bite 90045 90044 90060 ●●●●● 90061 90009 90045 90044 90060 ●●●● ○ 90061 90009 90045 90044 ●●● ○○ 90045 90040 90032 90044 Rotor Longevity 90045 90044 ●●●●● 90045 90044 ●●●● ○ 90045 90044 ●●● ○○ 90045 90040 90032 90044 Pad Longevity 90009 (Dry Conditions) 90045 90044 ●● ○○○ 90045 90044 ●●● ○○ 90045 90044 ●●●●● 90045 90040 90032 90044 Pad Longevity 90009 (Wet Conditions) 90045 90044 ● ○○○○ 90045 90044 ●● ○○○ 90045 90044 ●●●● ○ 90045 90040 90104 90105 90002 Keep in mind that there may be compatibility issues with certain rotor material and pad material combinations.Check for any such warnings on the components or packaging. 90003 90002 Finding the correct replacement pads for your system can be difficult. A good option is to bring the bike or pad into a good bike shop and ask for assistance. Otherwise look up your specific caliper model on the manufacturer’s website to find the correct pads. Alternatively, look for a replacement pad that looks identical in shape to your old pads. If it’s the same shape, it’ll likely work on your brake. 90009 90003 90111 90002 pad material specification printed on the rotor 90003 90114 90002 It can be useful to scroll through a retailer’s website to find and purchase a compatible replacement pad 90003 2 90004 Pad Removal 90005 90002 Begin by mounting the bike in a repair stand and removing the wheel.90003 90002 There are a multitude of common brake caliper designs. This article will highlight some of the key things that may be present on your system. 90003 90002 90060 NOTE: 90061 Pay attention to the orientation of parts, because this process will be reversed for installation. 90003 90006 Retaining Pin 90007 90002 Some caliper designs use a a retaining pin to secure the pads. If one is present remove it. 90003 90131 Common retaining pin styles (L-R): Cotter Pin, Threaded Pin, Pin with pin clip 90002 This design uses a cotter pin.Bend the ends straight to remove. 90003 90134 90135 90136 For this design, pads are removed out the bottom of the caliper 90002 Some designs have a pin clip.If so, remove it before removing the retaining pin. 90003 90139 90140 90141 For this design, pads are removed through the top of the caliper 90006 Springs 90007 90002 Some pads systems use a spring that is removed with the pads.Note that new pads come with a new spring. 90003 90146 90002 Set of Pads with spring 90003 90149 90002 Pads & Spring assembled and ready to install 90003 90006 Magnets 90007 90002 Some designs use a magnet to hold the pads against the pistons.Magnets may be found on calipers with or without a retaining pin. 90003 90156 These pads use magnets in conjunction with a retaining pin 90002 The design below has an additional consideration. If the outer pad is removed first, the inner pad will come out easier. If the pads are still getting stuck, it can also help to bring the pad adjuster all the way out.90003 90159 These pads secure inside the caliper using only magnets 90006 Clips 90007 90002 This design uses a clip on the pad to hold it in place. It may take some force to remove the clipped pads. 90003 90164 90006 Other Design Considerations 90007 90002 For this design you will grab the pad and move it inwards, and then pull.Remove the spring as well. 90003 90169 90002 This design can be tricky 90003 90172 90002 First, push the outer pad to the center and pull to remove 90003 90175 90002 next, push the inner pad to the center and pull to remove 90003 90178 90002 Be sure to remove the clip 90003 90002 This design is a bit unique.Remove the spring first from the top, then the pads can be removed from the bottom. 90003 90183 90184 90185 3 90004 Caliper Preparation 90005 90002 Before installing the new pads, we need to fully retract the pistons.This makes room for the extra pad material on the new pads. 90009 90003 90006 Hydraulic 90007 90002 For hydraulic calipers, press the pistons back into the caliper body. If you do not have a purpose-built tool such as the PP-1.2 Piston Pad Spreader, use a flat non-marring tool such as a tire lever or cone wrench. If you accidentally squeeze your brake lever at any point in the process with the wheel removed, the pistons will come back out and you will need to repeat pressing them into the caliper.90003 90195 90196 90060 NOTE: 90061 The TRP High Road caliper should be treated like it is hydraulic. Even though there is a cable, the internals are hydraulic. 90199 90196 90060 NOTE: 90061 If you have have a flat mount Shimano hydraulic brake, take extra care to apply even pressure on the pistons so as not to damage the ceramic pistons. 90199 90204 90205 90002 PP-1.2 Pad Spreader 90003 90208 90002 Cone wrench 90003 90006 Mechanical 90007 90002 For mechanical calipers, turn the pad adjuster (s) counter-clockwise until they stop.90003 90215 90216 4 90004 Pad Installation 90005 90002 The steps for pad installation are simply the steps for removal in reverse. 90003 90002 Keep the following in mind: 90003 90006 Installation order 90007 90002 If the pads required one pad to be removed before the other could be removed, reverse this order for installation.90003 90006 Clips 90007 90002 It may take some force to install the clipped pads. 90003 90006 Springs 90007 90002 Some springs have a correct and incorrect orientation. This information should be included with the pad packaging. 90003 90235 90002 Example of incorrect clip orientation 90003 90238 90002 Proper clip orientation 90003 90002 After putting the pads in the spring, line up the pads appropriately and use a bit of force to get them to click in.This can require several attempts to get the pads and springs properly seated. 90003 90006 Retaining Pin 90007 90002 Install any retaining pin. On systems with a cotter pin, make sure to give the cotter pin a good bend to prevent it from sliding out. 90003 90247 90248 90002 On systems with a threaded retaining pin, be aware of any torque specification from the manufacturer.In general, the pin should be snugged to the caliper body. 90003 90002 Be sure to reinstall any pin clip. 90003 90140 90139 90002 90060 NOTE: 90061 it is normal for correctly installed pads to have a bit of wiggle once they are installed.90003 90002 Reinstall the wheel, making sure it is properly seated. 90003 90195 90196 For mechanical disc brakes, after installing new pads you will need to align your calipers. 90199 90196 For hydraulic disc brakes, pump the lever to move the pistons and pads back to the working position. Pump until you feel the pads firmly contacting the rotor. Spin the wheel and inspect the pads for alignment. If there is no rubbing, you are done. If there is rubbing, it’s likely an alignment issue — see Hydraulic Disc Brake Alignment.90199 90204 .90000 Mercedes-Benz W203 Front Brake Pad Replacement — (2001-2007) C230, C280, C350, C240, C320 90001 90002 Replacing your brake pads is one of the easiest jobs to perform on your Mercedes. In general, you should inspect your brake pads about every 25,000 miles, and replace them if the material lining of the pad is worn down enough to trigger the pad replacement sensor or there is less than a quarter inch of material on the pad. In reality, most people do not inspect their pads very often, and usually wait until they see the little brake-warning lamp appear on the dashboard.It’s a wise idea to replace the pads, and inspect your discs as soon as you see that warning lamp go on. 90003 90002 If you ignore the warning lamp, you may indeed get to the point of metal on metal contact, where the metal backing of the pads are contacting the brake discs. Using the brakes during this condition will not only give you inadequate braking, but will also begin to wear grooves in your brake discs. Once the discs are grooved, they are damaged, and there is often no way to repair them.Resurfacing will sometimes work, but often the groove cut will be deeper than is allowed by OEM specifications. The smart thing to do is to avoid this problem replace your pads right away. 90003 90002 The first step is to jack up the car and remove the road wheel. This will expose the brake caliper that presses the pads against the disc. 90003 90002 To replace the front brake pads on the Mercedes W203, you need to remove the caliper. 90003 90002 Begin by unplugging the wear sensor attached to the pad.It simply pulls out from where it is attached to the caliper. 90003 90002 Use a large screw driver between the pad and disk to compress the caliper piston back into the caliper. This will make removing the caliper from the disk easier, especially if the risks are worn. 90003 90002 Next remove the two 12mm bolts holding the caliper to its mount. 90003 90002 After the guide bolts have been removed, you should be able to simply lift the caliper off of its mount. Suspend the caliper using some zip-ties or rope until you are ready to work with it again.Never let the caliper hang from its rubber hose (this can damage the brake line) 90003 90002 Once you have the caliper removed, inspect the inside of it. Make sure that the dust boots and the clamping rings inside the caliper are not ripped or damaged. If they are, then the caliper may need to be rebuilt. At this point, you should inspect the brake discs carefully. Using a micrometer, take a measurement of the disc thickness. If the disc is worn beyond its specifications, then it’s time to replace it along with the one on the other side (see Project on replacing brake discs).90003 90002 To install the new brake pads, you will need to take a C-clamp and old brake pad to push the caliper piston back into the caliper. This is because the new pads are going to be quite a bit thicker than the old worn-out ones, and the piston is set in the old pad’s position. Push back the piston using the clamp, being careful not to use too much force. Using a screwdriver here can accidentally damage the dust boot and seals inside the caliper, and is not recommended. 90003 90002 Be aware that as you push back the pistons in the calipers, you will cause the level of the brake reservoir to rise.Make sure that you do not have too much fluid in your reservoir. If the level is high, you may have to siphon out a bit from the reservoir to prevent it from overflowing. 90003 90002 Move to the caliper mount bracket and remove the two brake pads from their mounts. 90003 90002 Use a pair of needlenose pliers to pull out the old sensor if you plan to re-use it. With a new sensor, simply push it into the hole on the pad as seen here. 90003 90002 Apply some anti squeal to the back of the new pads and install them in there brackets on the caliper mount.With the piston compressed into the caliper reinstall the caliper over the pads and back onto the bracket. Install the guide bolts and torque to spec. Once the caliper is mounted to the bracket, plug the sensor back into the harness. 90003 90002 When finished with both sides, press on the brake pedal repeatedly to make sure that the pads and the pistons seat properly. Also make sure that you top off the master cylinder brake fluid reservoir if necessary. Brake pads typically take between 100 and 200 miles to completely break in.It’s typical for braking performance to suffer slightly as the pads begin their wear-in period. Make sure that you avoid any heavy braking or emergency maneuvers during this period. 90003 90032 90033 90034 90002 Figure 1 90003 90037 90038 90002 The first step is to jack up the car and remove the road wheel. This will expose the brake caliper (red arrow) that presses the pads against the disc (yellow arrow). 90003 90002 Large Image | Extra-Large Image 90003 90037 90044 90033 90034 90002 Figure 2 90003 90037 90038 90002 Begin by unplugging the wear sensor attached to the pad.It simply pulls out from where it is attached to the caliper (yellow arrow). 90003 90002 Large Image | Extra-Large Image 90003 90037 90044 90033 90034 90002 Figure 3 90003 90037 90038 90002 Use a large screw driver between the pad and disk (yellow arrow) to compress the caliper piston back into the caliper. This will make removing the caliper from the disk easier, especially if the risks are worn. 90003 90002 Large Image | Extra-Large Image 90003 90037 90044 90033 90034 90002 Figure 4 90003 90037 90038 90002 Next remove the two 12mm guide bolts (yellow arrows) holding the caliper to its mount.90003 90002 Large Image | Extra-Large Image 90003 90037 90044 90033 90034 90002 Figure 5 90003 90037 90038 90002 After the guide bolts have been removed, you should be able to simply lift the caliper off of its mount. 90003 90002 Large Image | Extra-Large Image 90003 90037 90044 90033 90034 90002 Figure 6 90003 90037 90038 90002 Suspend the caliper using some zip-ties or rope (yellow arrow) until you are ready to work with it again.Never let the caliper hang from its rubber hose (this can damage the brake line) .Once you have the caliper removed, inspect the inside of it. Make sure that the dust boots and the clamping rings inside the caliper (red arrow) are not ripped or damaged. If they are, then the caliper may need to be rebuilt. 90003 90002 Large Image | Extra-Large Image 90003 90037 90044 90033 90034 90002 Figure 7 90003 90037 90038 90002 To install the new brake pads, you will need to take a C-clamp and old brake pad (yellow arrow) to push the caliper piston back into the caliper.This is because the new pads are going to be quite a bit thicker than the old worn-out ones, and the piston is set in the old pad’s position. Push back the piston using the clamp, being careful not to use too much force. 90003 90002 Large Image | Extra-Large Image 90003 90037 90044 90033 90034 90002 Figure 8 90003 90037 90038 90002 Be aware that as you push back the pistons in the calipers, you will cause the level of the brake reservoir to rise. Make sure that you do not have too much fluid in your reservoir.If the level is high, you may have to siphon out a bit from the reservoir to prevent it from overflowing. 90003 90002 Large Image | Extra-Large Image 90003 90037 90044 90033 90034 90002 Figure 9 90003 90037 90038 90002 Move to the caliper mounting bracket and remove the two brake pads from their mounts (yellow arrows). 90003 90002 Large Image | Extra-Large Image 90003 90037 90044 90033 90034 90002 Figure 10 90003 90037 90038 90002 Use a flathead screw driver to carefully push out the old sensor (yellow arrow) if you plan to re-use it.With a new sensor, simply push it into the hole on the pad. 90003 90002 Large Image | Extra-Large Image 90003 90037 90044 90033 90034 90002 Figure 11 90003 90037 90038 90002 Apply some anti squeal to the back of the new pads and install them in there brackets on the caliper mount. 90003 90002 Large Image | Extra-Large Image 90003 90037 90044 90033 90034 90002 Figure 12 90003 90037 90038 90002 With the piston compressed into the caliper reinstall the caliper over the pads and back onto the bracket.Install the guide bolts and torque to spec. Once the caliper is mounted to the bracket, plug the sensor back into the harness. 90003 90002 Large Image | Extra-Large Image 90003 90037 90044 90177 .

Добавить комментарий

Ваш адрес email не будет опубликован. Обязательные поля помечены *